Showing posts with label CSA. Show all posts

Saturday, 1 October 2011

For sale

With me concentrating on my 15mm armies, I've reluctantly decided to part with my 28mm units and listed them on E-Bay. I'll be able to use any funds they generate to purchase the necessary figures to finish Union I Corps. So some final pictures of said figures.

The first unit. http://www.ebay.co.uk/itm/28mm-Perry-ACW-Confederates-/230680421593?pt=UK_Toys_Wargames_RL&hash=item35b59fe4d9


Second unit http://www.ebay.co.uk/itm/28mm-Perry-ACW-Confederates-/230680421955?pt=UK_Toys_Wargames_RL&hash=item35b59fe643


Wednesday, 14 September 2011

Quick update

Just up dated my two pages with the latest figures to be completed, namely the Union Division leader Gibbon from II Corps and Robertson's cavalry brigade as part of Stuart's division. No pictures at this time as been feeling a bit under the weather and just don't have the energy.

Sunday, 21 August 2011

2nd unit finished

Just adding a photos of the completed 2nd unit of my 28mm ACW. I've also painted up the 8 figures to act as skirmishers and will post some pics when I finish basing them.


Friday, 19 August 2011

Battle of Gildons Crossing

This is the 3rd installment of a mini fictitious campaign I've been running at the club. Following on from the Confederate victory at Bakersville, Longstreet advanced his 2 Divisions north to Gildons crossing.There he was awaiting re supply to replace much of his lost artillery. It was then in the early hours of the morning that Hampton rode in with his Cavalry the General Early had crushed the Federal forces at Cedar Creek, but that a force was marching upon Longstreet's position. His orders were to hold until reinforcements could arrive by rail.

Federal forces however were in much need of a decisive victory after receiving two bloody noses against the rebels. With a quickly assembled force they realised that Longstreet was isolated in the vicinity of Gildons crossing. They were to proceed with haste with available forces to destroy Longstreet before he could be reinforced.

Confederate forces consisted of 2 infantry divisions of 7 brigades, 2 artillery batteries and Hampton's cavalry brigade. Opposing them were 3 Federal infantry divisions of 9 brigades and 4 artillery batteries. The battle opened with the Federal forces advancing towards the rebel positions behind Gildons creek and into the town itself. The Rebels decided to contest the creek and hold until reinforcements arrived, that was until one of Mclaws' brigades crossed the creek straight into the face of 3 Federal brigades. It was then that a furious struggle ensued as the outnumbered rebels were slowly destroyed. On the Federal right the Division of Caldwell led by the Iron Brigade advanced towards the creek to be met with the rebel yell and were promptly thrown back into the woods and hotly pursued by their enemies.

Iron Brigade emerging from the woods

The rebel positions

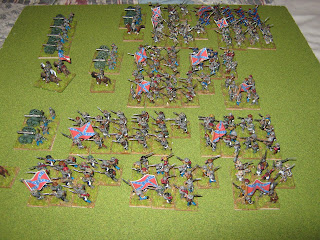
Hampton's dismounted troopers

With the Rebels hurriedly bringing up the rest of Mclaws' division to reinforce their right flank as Federal forces quickly crossed the creek. One of his brigades smashed into the advancing federals temporarily throwing them back across the creek. It was at this point that the union artillery began to find its range and began to pummeling the 2 remaining brigades of Mclaws, eventually destroying his division. On the Federal right things were not going well. Despite the Iron brigade beginning to live up to its reputation and doggedly hanging in, the other 2 brigades of Zook and Brooke were destroyed by the advancing rebels.

Hood's division in position

Federal troops pushing the rebels back

By now things were beginning to go wrong for Longstreet. With the destruction of Mclaws' division and no sign of reinforcements, discretion became the better part of valour and he decided to break off the engagement and save the remains of his Corps. A hard fought and much needed Federal victory.

 Overall for my nephew who took on the role of Longstreet, his first ever independent command, he did okay. made a few mistakes, but at least learned from them i.e. don't attack unsupported. he was though assisted with some uncanny luck in melee, rolling 6 tens in 8 combats. Turning what should have been defeats into unlikely victories.

A few extra pictures of the battle.


Saturday, 23 July 2011

28mm Confederates

Finally finished painting my first unit of the Perry Plastic ACW figures. First up is a 20 figure strong unit. I've multi-based them all as I intend to use them with either Black Powder or Fire and Fury. I've quite enjoyed putting the unit together. I've got enough figures to do 2 more 20 figure unit and a small unit of 8 figures to act as skirmishers or pickets.


They still need the bases finished and a flag added. Just need a new colour cartridge for my printer to print it out.

Friday, 22 July 2011

Battle of Cedar Creek

After last weeks Battle of Bakersville at the club, it was decided to do a follow up battle. The situation was as follows. After the defeat of 2 Union Corps at Bakersville, Lt General Ewell (Me) advanced a little north of the town and rested the Corps, whilst Longstreet pursued the remenants of the Union forces further north. Arriving late at the Cedar Creek Lt General Ewell called a halt and the Divisions of Rodes, Johnson and Early settled down in their current locations.

As dawn broke, Brigadier Hampton and his cavalry whom at earlier been dispatched north of the Creek sent back a messenger with the news that he was in contact with the lead elements of what he estimated to be a full Union Corps. He estimated that they were no more than an hour away before they would be upon our encampments.

Rodes' and Johnson's Divisions were positioned as shown on the map below. Early was somewhere to the East and would be marching to the sound of the guns.


The Battle unfolds

As the union Corps of Sykes advanced down the lane they were met with a hail of shot from Hampton's troopers which checked their initial advanc. it then took a number of turns for the Union forces to begin to deploy north of the Creek. This allowed Johnson to bring forward his Division while Rodes prepared to defend Bolton farm and the main ford.

Hampton's brigade quickly re mounted in the face of heavy pressure and rode of to the west to try and find a way through the woods and circle behind the union troops. The Union V Corps then began to deploy its artillery while pushing forward their infantry across the creek to meet Johnson head on. It was at this time that Early arrived from the East and fell upon their flank. It took over 6 turns of heavy fighting and stubborn union resistance to finally force them across the creek.

Johnson's Division advances

Early's Division appears
It was at this time then General Rodes' saw his left flank threatened by the appearance of a second union Corps emerging through the woods to cross the creek. They was also supported by a Cavalry Dision. Rodes quickly re aligned his defenders and re positioned his artillery to meet this threat, despite being heavily outnumbered.

Union III Corps arrives

It was at this time that disaster befell the union V Corps, despite gallantly hanging in they eventually wee swept from the field. Of 8 Brigades, only one remained. General Sykes himself was captured by Avery's brigade along with 2 reserve artillery batteries. For the Union III Corps things did not go much better when finally getting into position to launch an attack on Rodes, the Confederates promptly charged them, sweeping aside Humphreys brigade. With both Early and Jonson advancing to support Rodes' gallant defenders the III Corps broke off its assault and retreat back into the woods, leaving the Rebsonce more in charge of the field.

Some extra photos of an enjoyable game


V Corps finally driven back

2 Confederate brigades prepare to defend the ford


Monday, 18 July 2011

update

Finally got my temperamental camera to work and get a couple of photos. A single photo of Brooke's and Zook's brigades from Caldwell's Division. Bringing the strength of my union forces up to 18.


Next up I painted up some test figures for a 28mm confederate brigade. I followed the same colour schemes as I had done for the 15mm but with an extra layer of highlights. They've come out quite dark (even more so in the picture) but that is the way I like them.


Monday, 4 July 2011

Re organising

Following the re fight of Gettysburg, I've decided to re organise the troops that I had painted up for the Western theatre into suitable units for Gettysburg. For the union I have managed to just about put together V Corps under Sykes. All that I need to add is 1 Corps Leader stand, 2 artillery stands and 1 brigade at 7 stands. Once these are done and I combine forces with Jon, between us we will have the following Corps, III, V, XI & XII and Bufords' Cavalry Division. That would only leave I, II and VI Corps to complete the union troops. That's more than half completed.

For the Confederates I am trying to put together Longstreet's Corps, namely the Divisions of Hood and McLaws who fought on day 2. So far all the troops are done for Hood and only 2 brigades to paint for Mclaws along with the supporting artillery. That is not an insurmountable task. Best get the paints out again.

Sunday, 3 July 2011

Gettysburg Refight

Just got back from Micks, re fighting the 2nd day of Gettysburg. I took the role of General Ewell with II corps. My initial orders were to capture and hold Cemetery hill and Culps Hill, supported by Dave in his role as AP Hill. To say our attack was successful was an understatement. We both smashed into the union XII and I Corps and proceeded to remove each brigade from the game before any assistance could arrive from III corps. We did benefit from being able to attack at 4 AM which meant many of the union Corps were still to arrive on the table (got to make the most of your opportunities). After the initial assault the game settle down into a bit of a slug fest with neither side being able to claim a victory. Eventually with honours even the Confederates were allowed to withdraw with the union unable to mount any form of assault. It seems that just like in history the union managed to check the threat towards Washington.

I did manage to take some photos which are below. However cannot remember which action was which. Hope you enjoy.


Thursday, 30 June 2011

Update

Managed to finish Colbert's and Martin's brigades. Only need to paint up 2 artillery pieces and that will finish Hebert's Division. With the addition of a Corps Commander and 3 more artillery pieces, I'll be able to field the 2 confederate divisions at Corinth under Price. I'll post some pictures of the completed division as soon as I locate the camera.

Also got the Gettysburg re fight this weekend. 2 full days of wargaming. can't wait

Sunday, 19 June 2011

Hebert's Division

I've had these 2 brigades from Hebert's Division on the painting table for about a year. Thought it was about time that I finished them off. All the figures are from Old Glory. the flags are by Revo. They are the brigades of Gates and Green. Just need to complete Colbert's and Martin's brigades, about 4 artillery pieces and I'll have finished Price's Corps


Thursday, 3 February 2011

Re inforcements

Starting to get back on track with putting some troops in the field the nearer I get to next months big game at Micks. I've got 2 Confederate brigades on the table from Herbert's Division. They need a little touch up as I picked them up off EBay. There should be enough figures left to field the remaining 2 brigades to complete the division. At the York show this weekend I intend to pick up some more artillery from Peter Pig to finish off.

Tuesday, 12 October 2010

Confederate II Corps

Finally finished the Confederate II Corps


Daniels' Brigade


Finally finished the last Brigade of Rodes' Division. This unit is 11 stands, all the figures are from Peter Pig. The brigade consists of the following regiments

- 32nd North Carolina
- 43rd North Carolina
- 45th North Carolina
- 53rd North Carolina
- 2nd North Carolina

Friday, 8 October 2010

General Ewell

Managed to finish the Corps stand to represent General Ewell of II Corps. The model of Ewell is a officer figure from Warrior miniatures, the trumpeter and standard bearer are both Peter Pig. Must admit that the Peter Pig horses are not my favourite, probably the only downside to an otherwise excellent range.


Next up some pre-painted tents that I picked up on EBay, nice little models and I'll definitely get some more.

Monday, 4 October 2010

Iversons Brigades

A photo of Iversons Brigade from Rodes' Division. All the figures are from Warrior miniatures apart from the command who are Peter Pig. This unit is seven stands and was made up of the following regiments.

- 5th North Carolina
- 12th North Carolina
- 20th North Carolina
- 23rd North Carolina