Disaster struck this week in relation to some of the scenery I've made. On Thursday night after the club finished at 10.30pm, the gale force winds that struck the north east swept the fields up and out of my hands, along with some movement cards. The cards I wasn't too bothered about, but it wasn't until I got home that I realised that one of the smaller fields was missing. Bloody typical, their were no street lights on in the car park and even with a couple of club members helping we didn't find the field.
For some good news I managed to pick up 5 buildings at Fiasco in Leeds, rather good value as total cost left change out of £15. They are currently being painted and I'll post some pics of the finished pieces. On the figure front, things a bit slow, currently painting the last cavalry brigade of Buford's division, then all done for Gettysburg. I do have a couple of extra union and confederate brigades to paint up, but these will be at my leisure as some other projects are needing my attention.
Sunday, 14 November 2010
Monday, 1 November 2010
Fiasco
This weekend I made the trip to the Leeds show Fiasco, it's the first time I have been for about 15 years. Overall the Savilles Hall provided an excellent setting for the show. There was a good selection of traders and I even managed to pick up a few bargains.
First up I managed to obtain 5 buildings from 3 separate traders for the ACW project. Total cost £13.20, not bad for rummaging around in sale boxes. I also purchased a bow of immortal miniatures classical Greeks from the Dave Thomas stand. I'll be able to add these to the First Corps ones I already have, making a nice winter project. The main item I was looking for were some 1/3000th WW2 naval, but nothing hit the mark in that scale, though did consider some 1/600th ancients naval, but managed to resist the urge.
Overall not a bad show, not sure if I would go again, mainly due to travel costs
Friday, 29 October 2010
Battle Report
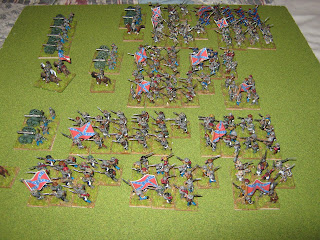
Last night at the club both my union and confederate forces got a taste of action. I commanded the union while my 2 nephews commaded the Rebel forces. It was a small scenario where 4 confederate divisions were converging on a cross road, currently held by a single union division, who were awaiting support from 3 further divisions in reserve.
The battle started with 2 confederate divisions, that of Rodes and Early advancing on the union division of Davies. The union defenders split their forces with 2 brigades and artillery defending a stonewall while Baldwins brigade defended the fields next to the cross roads. As the confederates advanced with Early taking the pass to assault the union right flank, while Rodes advanced upon the centre. The lack of union artillery was easily felt as they could not hinder the advance.
Eventually to the succour of the union reinforcements arrived, however this was Buford's division of 1 cavalry brigade and 1 artillery piece, who quickly headed for the cross roads to support Baldwins brigade just as Rodes was beginning his assault. Early meanwhile had managed to get part of his division across the stream and promptly launch a devastating assault against the stonewall. To make matters worse for the union a 3rd confederate division of Maury had also arrived and were quickly following the roads to press the union centre.
Early's assault quickly swept the 2 brigades of Hackleman and Oglesby from the stonewall and captured a battery of artillery. Their advanced was only partially checked by the timely arrival of Birney's division. In the Centre it was taking time for Rodes to get his troops in order, Hampton's cavalry were promptly devastated by telling fire from Buford's cavalry and retreated in earnest.
Birney's Division began the union counter attack and promptly destroyed Smith's brigade and shattered Hay's brigade. however they were then checked by the 2 remaining brigades of Early's division. In the Centre Buford's cavalry were forced to retire by pressure from Rodes, Baldwin also fell back. The 2 brigades of Hackleman and Oglesby which had already suffered much at the hands of Early found themselves assault by the lead elements of Rodes Division and both brigades were promptly destroyed.
While running out of troops to hold the confederate assault, the last thing the union needed was the arrival of Johnson division, following the route that Early had taken. Even the arrival of the last union division of Humphrey was not enough to hold their positions. Both flanks had collapsed and the centre was under intense pressure. The union then promptly abandoned their positions and fell back, leaving the field to the rebels.
Below are some of the pictures I took of the battle.
Friday, 22 October 2010
Progress report
After finishing the 2 Corps that I need to provide for the re fight of Gettysburg, I've made a start on the 2 cavalry brigades from Buford's division. I hope to have the first of these finished over the weekend. I've also constructed a smaller cornfield that is in the process of being undercoated along with 2 new buildings courtesy of Peter Pig. That will give me four set fields for any club games with 2 small farms.
As I've been enjoying this project I've decided that I want to expand my forces, however with the rest of the army at Gettysburg being painted by the others I don't want to repeat the units (these will most probably be my main opponents with these forces). To get around this I've started to paint up some of the units from the Western Theatre, mainly for the Battle of Corinth. This is a relatively small affair with only 4 union and 3 confederate divisions. So far I've already got the 3 brigades of Maury's division painted, just need to add the artillery. For the union I've got enough unpainted figures to put together the 2 divisions of Hamilton and Davies. Whether I actually go on to finish all the divisions will depend on how my enthusiasm holds for this project before the new new thing comes along.
As I've been enjoying this project I've decided that I want to expand my forces, however with the rest of the army at Gettysburg being painted by the others I don't want to repeat the units (these will most probably be my main opponents with these forces). To get around this I've started to paint up some of the units from the Western Theatre, mainly for the Battle of Corinth. This is a relatively small affair with only 4 union and 3 confederate divisions. So far I've already got the 3 brigades of Maury's division painted, just need to add the artillery. For the union I've got enough unpainted figures to put together the 2 divisions of Hamilton and Davies. Whether I actually go on to finish all the divisions will depend on how my enthusiasm holds for this project before the new new thing comes along.
Saturday, 16 October 2010
Fields
Finally managed to finish the cornfield. The fencing and ground areas were completed like the earlier field. The corn field was teddy bear fur, covered in PVA glue and then painted chocolate brown. It was then given successive highlights of Yellow ochre and finally sunburst yellow. I'm more than happy with the results.


I also managed to complete another plain field, constructed in the same way.

These are 2 buildings I picked up from EBay, I'm not too sure of the make, but they are rather nice little models.

I also managed to complete another plain field, constructed in the same way.
These are 2 buildings I picked up from EBay, I'm not too sure of the make, but they are rather nice little models.
Friday, 15 October 2010
John Buford
 During the Gettysburg Campaign, Buford, who had been promoted to command of the 1st Division, is credited with selecting the field of battle at Gettysburg. On June 30, his command rode into the small town of Gettysburg. Very soon, Buford realized that he was facing a superior force of rebels to his front and set about creating a defense against the Confederate advance. He was acutely aware of the importance of holding the tactically important high ground about Gettysburg and so he did.
His skillful defensive troop dispositions, coupled with the bravery and tenacity of his dismounted men, allowed the Union I Corps, under Maj. Gen. Reynolds, time to come up in support and thus maintain a Union foothold at strategically important positions. The importance of Buford's leadership and tactical foresight on July 1 cannot be overstated in its contribution to the eventual union victory
Tuesday, 12 October 2010


Subscribe to:
Posts (Atom)